Note:
This tutorial was written using a Windows 10 laptop, Google Chrome, FileZilla version 3.6, and DreamHost shared hosting. Things may look different on other browsers, operating systems, or versions.
What Is FileZilla?
FileZilla is a free file transfer software used to upload files from your local computer to your website, or download from your website, or other tasks. The advantage of FileZilla, compared to DreamHost and other built in file transfer tools, is that it’s much faster to upload files, you can see the folder structure both locally and online easily, and it’s faster to connect to your site(s) than it is on the web.
How Do I Start?
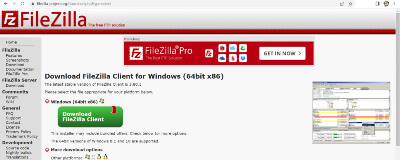
- Download Filezilla. Go to filezilla-project.org/download.php?type=client (or search for filezilla in your browser) and download the free client version.
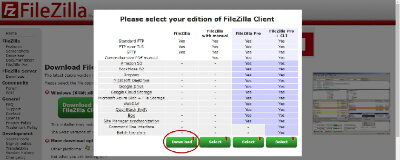
- Click the button on the leftmost column (basic Filezilla), not with manual (unless you want a user manual), not Pro (unless you want the higher end, paid version).
- Click on the downloaded file in your browser, or go to Downloads and click on the downloaded file from there. Allow it to make changes to your device. Agree to the license agreement.
- Click through the installation wizard, leaving everything as default. Click Install. Click Finish and allow it to Start Filezilla Now.
- Click OK on the Welcome popup.
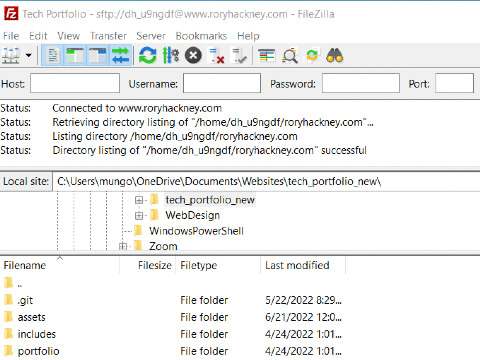
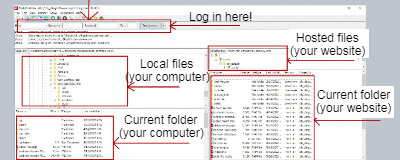
- An explanation of the system: at the top are fields that you fill out to connect to your hosted website files. The Local Site box refers to a folder on your computer, holding your local files. Below that is all the filenames within it. If you change the folder in Local Site, for example to the folder holding your current project, it will then display those files for easy file transfer.
- If you’re not sure how to find your desired folder in Filezilla, you can navigate to the folder in File Explorer, and click the folder icon to display the path to that folder.
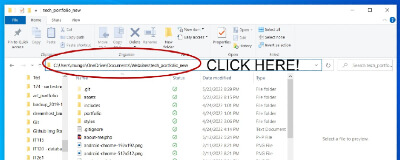
- Copy your preferred folder path and paste it in the Local Site field. Filezilla should now display your files.
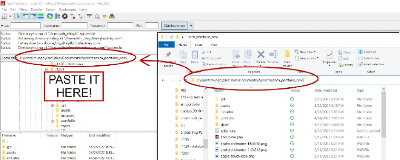
- Now, on the right side of Filezilla, Remote Site will display your web hosting server files once you enter your host name, username, password, and port.
- Your hostname is easy to find, being the name of your website. For example, my website is https://www.roryhackney.com, so my hostname is roryhackney.com.
- You can either connect using Secure File Transfer Protocol (SFTP, preferred) or insecure File Transfer Protocol (FTP). To connect securely, prefix sftp:// before your hostname, ie sftp://roryhackney.com, or enter 22 for the port. 21 is the port for FTP.
- Your username (at least in Dreamhost) is a more secure randomized string of letters and numbers created by Dreamhost, not your email. You can find it by logging in to dreamhost.com and going to Websites > Manage Websites > Your Website > Manage Your Site > Show Login Info.
- Your password will be what you set when you made your web hosting account. If it doesn’t work, try resetting your password, even if you’re sure it’s right. It could be a bug causing the issue.
- Enter your port if you haven't already. 22 for SFTP, 21 for FTP, or another port if you've changed it manually or with code.
- Press Quickconnect. There may be a popup saying the host key is unknown. You can check Dreamhost or your hosting provider to be sure, or just click OK. The right side of the Filezilla screen should now be populated with the files in your web hosting service.
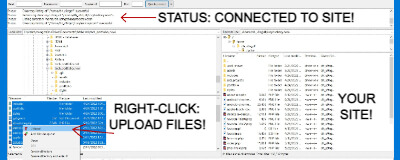
- To upload files, simply drag them from the left side to the right, into the folder you want, or right click and press upload to put them into the folder that’s open on the right. You are now set up with Filezilla!
Bonus: Saving Site Connections Using Site Manager
If you connect to a website often, it might be worth your time to save your settings and credentials using Site Manager.
- In FileZilla, click File > Site Manager.
- To create a new site connection, click New Site on the bottom left, and fill out the fields on the right.
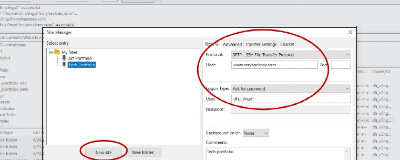
- Set Protocol to SFTP - Secure File Transfer Protocol, unless you want to use FTP instead.
- Set Hostname to yoursite.com.
- If Port is something other than the default 21 for FTP or 22 for SFTP, enter it there. Otherwise, the Site Manager will automatically set this based off Protocol.
- Set the Logon Type to your preferred authentication, such as Ask For Password.
- Set the User to your username.
- Now anytime you want to connect to your site quickly and easily, just select your site in Site Manager and click Connect!
I hope this helps you with uploading your files more quickly and easily. FileZilla is a great tool used by many developers! If you found this helpful, please consider checking out my web development portfolio.
Thanks for dropping by!
Back to topThank you!
Thanks for checking out my work! If you've got a project or job you think suits me, contact me here, by email, or on LinkedIn.
Contact Me
Thanks for dropping by!
Back to top